GEO 583 Internet Mapping and Distributed GIServices
LAB SEVEN: Group Project (Bootstrap) and ESRI Story Maps
Created by Dr. Ming-Hsiang Tsou,
Department of Geography, San Diego State University
Due day: next Tuesday at 12:30.
10 Points (total 100).
Group Project Data Sets: Y: drive /group folder.
Accessibility Issue for the Web design.
Section 508 Law: http://www.section508.gov/
In 1998, Congress amended the Rehabilitation Act to require Federal agencies to make their electronic and information technology accessible to people with disabilities. Inaccessible technology interferes with an individual's ability to obtain and use information quickly and easily. Section 508 was enacted to eliminate barriers in information technology, to make available new opportunities for people with disabilities, and to encourage development of technologies that will help achieve these goals. The law applies to all Federal agencies when they develop, procure, maintain, or use electronic and information technology.
San Diego State University Accessibility Policy: http://access.sdsu.edu/
It is the policy of the California State University to make information technology resources and services accessible to all CSU students, faculty, staff, and the general public regardless of disability status. CSU Executive Order 926, which went into effect on January 1, 2005, establishes the policy, specifies campus responsibilities, and offers supplemental guidance to ensure that the proper and integrated actions of each campus are effectively mobilized to comply with the policy and law.
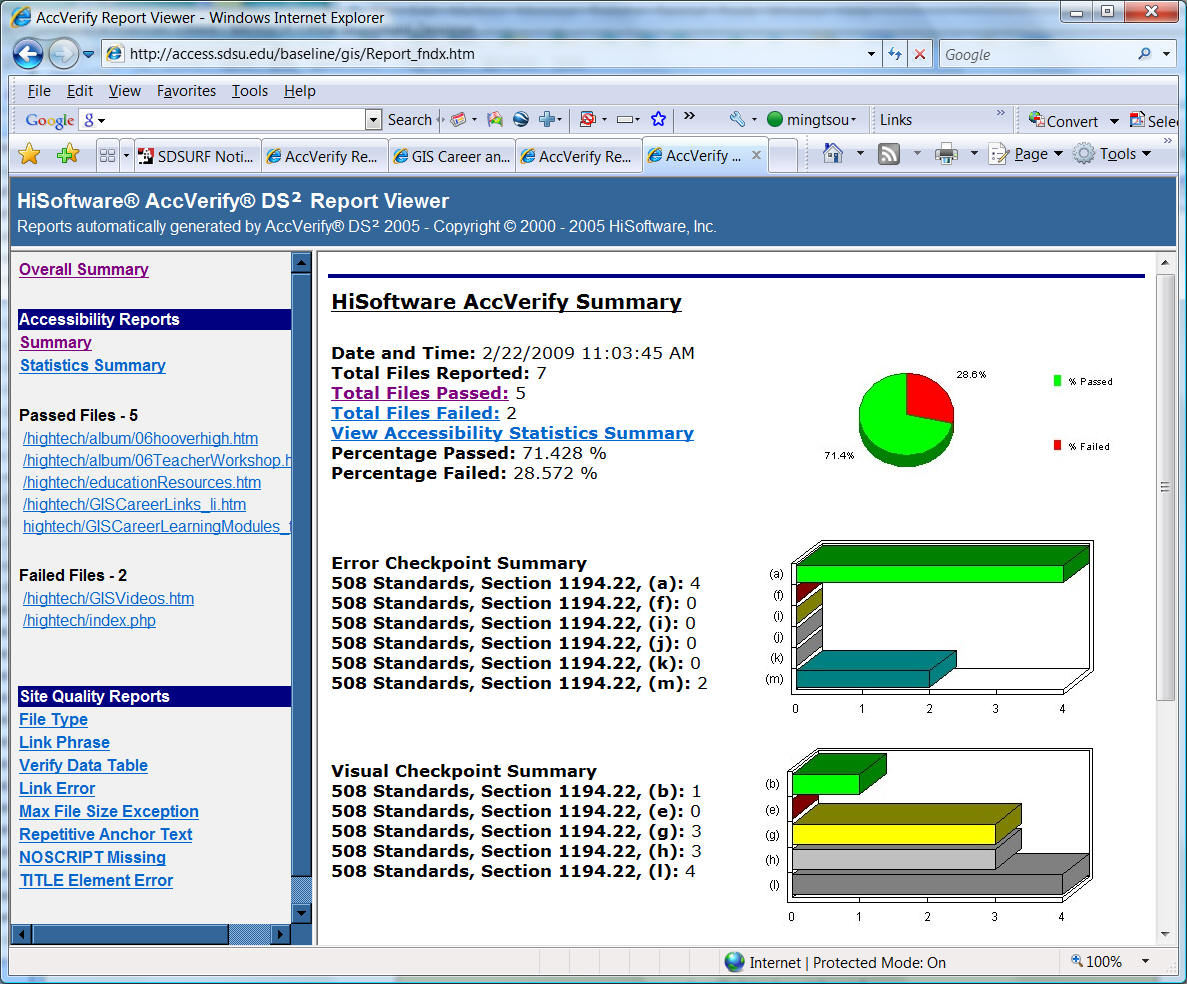
One example of Accessibility Test Result:
![]()
PART-1: Introduce Bootstrap template for Group Project Web Design
![]()
Each Group project will be assigned a new account (SFTP only) for publishing their group project pages.
The Group project will select one member for the Web authoring tasks. Therefore, the group project website will be saved in the assigned person's own folder.
Here is the procedure:
The selected member will use his/her own student class account to login the SAL lab computers (PC) and use WINSCP to upload the Group Project Website.
After you revised the page. You can publish this group project into your group Web page using WinSCP (open the application in your Desktop).
Host name: mappingideas.sdsu.edu
Login-in Name: group#
Password: ##########
Please use this Group project Web page to introduce your group project and related information. Then link it to our Internet Map Services.
Here is the link to check your published group project
HTTP://mappingideas.sdsu.edu/583group_2018
To Build a Group Project, You can use Free Online Web Tools, such as WIX ( http://www.wix.com ), Weebly ( http://www.weebly.com ).
Another Option is to use the "BootStrap" template to create your group project website.
"Bootstrap is the most popular HTML, CSS, and JavaScript framework for developing responsive, mobile-first web sites." ( https://www.w3schools.com/bootstrap/ ).
Please read the Bootstrap 3 Tutorial first ( Click on Green tab "Next" when you finish the reading of each page). https://www.w3schools.com/bootstrap/bootstrap_get_started.asp
What is the "Bootstrap Grid System? Why this template is "responsive"?
What is "Jumbotron"?
You don't need to complete the whole tutorials. Just first 10 sections will be good enough.
The next step is to learn the writing of the Bootstrap codes with Code-cademy:
https://www.codecademy.com/courses/web-beginner-en-yjvdd/0/1
After creating the website using the Bootstrap template, you can use WinSCP to upload the website to the mappingideas.sdsu.edu server.
![]()
![]()
PART-II: ESRI Story Map Exercises
Spend 15 minutes to read this Story Maps Tour Tutorial: http://storymaps.arcgis.com/en/app-list/map-tour/tutorial/ (You don't need to follow the procedure yet).
Think about what kind of Story Maps you like to create?
Take a look at some good examples, such as Live Well San Diego:
There are several types of Story Map Builder to select:
1. Story Map Journal Builder: https://storymaps.arcgis.com/en/app-list/map-journal/
2. Story Map Tour Builder: https://storymaps.arcgis.com/en/app-list/map-tour/tutorial/
For More Story Maps options, Check this website: https://storymaps.arcgis.com/en/app-list/

Now, you can create your own Story Maps by Picking up ONE of the ESRI Story Maps templates (Tour or Journal or Series, or SWIP, or Basic). Please make sure to use the organization account you created from the previous lab.) and Share the final story map with the Public.
Publish your own Story Maps and Share it with the "Public" then Post the link into the Lab-7 Forum.
![]()
4. What to turn in (in the Black Board)
(print out a paper copy to the Instructor)
1. Each Group need to publish their first Group Project Website (no need to print out. But we will check the website in the next week).
1. Write a short description (300 words) about your own Story Map and the URL to access the Story Map.
![]()
Google Map API Tutorial ( SKIP in 2016)
![]()
Note: some functions might be no longer available in Google Map due to the change of its APIs.
Step-1: Create a new LAB-7 webpage in your personal website.
1. Open your personal website folder (Z: drive web-[yourlastname]) with the Frontpage.
2. Create a new webpage called "lab-7.htm", add navigation bar, title, and other necessary web components on the new webpage. Our new Google Map exercises will be added into this new webpage.

To create Google Maps for your own application, sometime you will need Google Map KEY, some applications will not need the Google Map KEY. We will introduce the application without the KEY first. Then introduce the Google Map API requiring KEY.
Step-2: Create Google Maps without KEY
You can easily to create a google map embedded inside a HTML page. Click on the following links to read more:
How to embed a google map in a Web page? http://maps.google.com/support/bin/answer.py?answer=72644&topic=10788
You can embed a simple map, a set of driving directions, a local
search, or maps created by other users. Here's how:
A. Ensure that the map you'd like to embed appears in the current map display.
B. Click "Link to this page" in the top-right corner of the map.
C. In the box that pops up, copy the HTML under "Paste HTML to embed in
website," and paste it into the source code of your website or blog.
If you'd like to adjust the size of the map before you embed it, just click
"Customize and preview embedded map," select your preferred size, and take a
look at the preview map. Once you're happy with what you see, copy the HTML that
appears in the box at the bottom of the window.
For example:
<iframe width="425" height="350" frameborder="0" scrolling="no" marginheight="0" marginwidth="0" src="http://maps.google.com/maps?f=q&source=s_q&hl=en&geocode=&q=San+Diego&sll=37.0625,-95.677068&sspn=37.462243,82.96875&ie=UTF8&ll=32.727798,-117.159662&spn=0.038898,0.081024&z=14&output=embed&s=AARTsJo3hBTnxmTcpFZy8zkLyKsEH2Jq2w"></iframe><br /><small><a href="http://maps.google.com/maps?f=q&source=embed&hl=en&geocode=&q=San+Diego&sll=37.0625,-95.677068&sspn=37.462243,82.96875&ie=UTF8&ll=32.727798,-117.159662&spn=0.038898,0.081024&z=14" style="color:#0000FF;text-align:left">View Larger Map</a></small>
3. Open a Google Map ( http://maps.google.com ) NOW, type a keyword search or refine the Google map.
4. Click "Link to this page" in the top-right corner of the map.
5. In the box that pops up, copy the HTML under "Paste HTML to embed in website,"
6. Open the Lab-7.htm, in the "Design View", type CODE-HERE, --> switch to the [Code view], paste the whole code (overwrite the CODE-HERE) into the Lab-7.htm . Save it.
7. Click on the "preview" window, see if the Google map is embedded in the HTML page.

![]()
Google My Maps
The next function is to try to use "My Maps" function in Google Map. First, you need to have a google email account. If you don't have a google account, please create one from here: https://www.google.com/accounts/NewAccount?continue=http%3A%2F%2Fmaps.google.com%2Fmaps%2Fms%3Fmsa%3D2%26ie%3DUTF8%26z%3D4&hl=en&service=local
1. watch the following videos: http://support.google.com/maps/bin/answer.py?hl=en&answer=62843
2. create your own map (using title "Lab-7-[your-lastname]). Please include at least ONE new polygon, one new marker, and one new line.
3. After your completed your own maps, save it, [Done],
4. Click "Link to this page" in the top-right corner of the map.
5. In the box that pops up, copy the HTML under "Paste HTML to embed in website,"
6. Open the Lab-7.htm, in the "Design View", type "Here is My Map", --> switch to the [Code view], paste the whole code (After the text "Here is My Map") into the Lab-7.htm . Save it.
7. Click on the "preview" window, see if the new google map (my maps) is embedded in the HTML page.
Here is the example:
<iframe width="600" height="350" frameborder="0" scrolling="no" marginheight="0" marginwidth="0" src="http://maps.google.com/maps/ms?ie=UTF8&hl=en&msa=0&msid=105450817019456693696.000464cf6c051b1a1d082&s=AARTsJqggV2389T2GAwC7OVXFbJjubwLcg&ll=32.776883,-117.072072&spn=0.006314,0.012875&z=16&output=embed"></iframe><br /><small><a href="http://maps.google.com/maps/ms?ie=UTF8&hl=en&msa=0&msid=105450817019456693696.000464cf6c051b1a1d082&ll=32.776883,-117.072072&spn=0.006314,0.012875&z=16&source=embed" style="color:#0000FF;text-align:left">View Larger Map</a></small>
![]()
Step-2: Create Google Maps with KML files
1. Open the ArcMap (from ArcGIS), start ArcMap with [A new empty map].
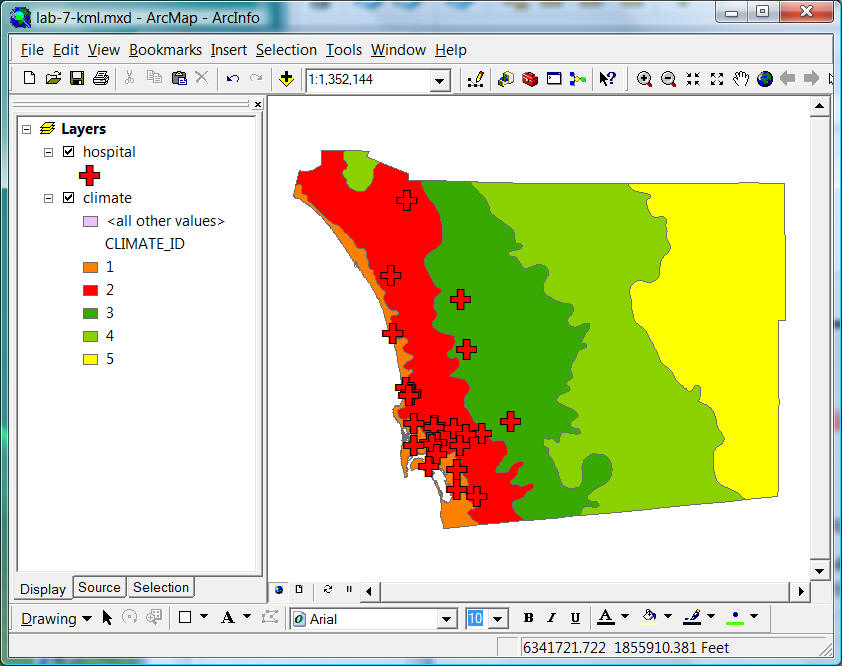
2. Add two GIS layers (you choose) from the Y: drive /group folder (For example, add the hospital layer from Y: \group\sandagnew\ [hospital], and [climate] layer. Change the layer symbols to appropriate cartographic representation.
3. Create a "Lab-7" folder in the Z: drive. Save the final map as Z:\Lab-7\lab-7-kml.mxd.
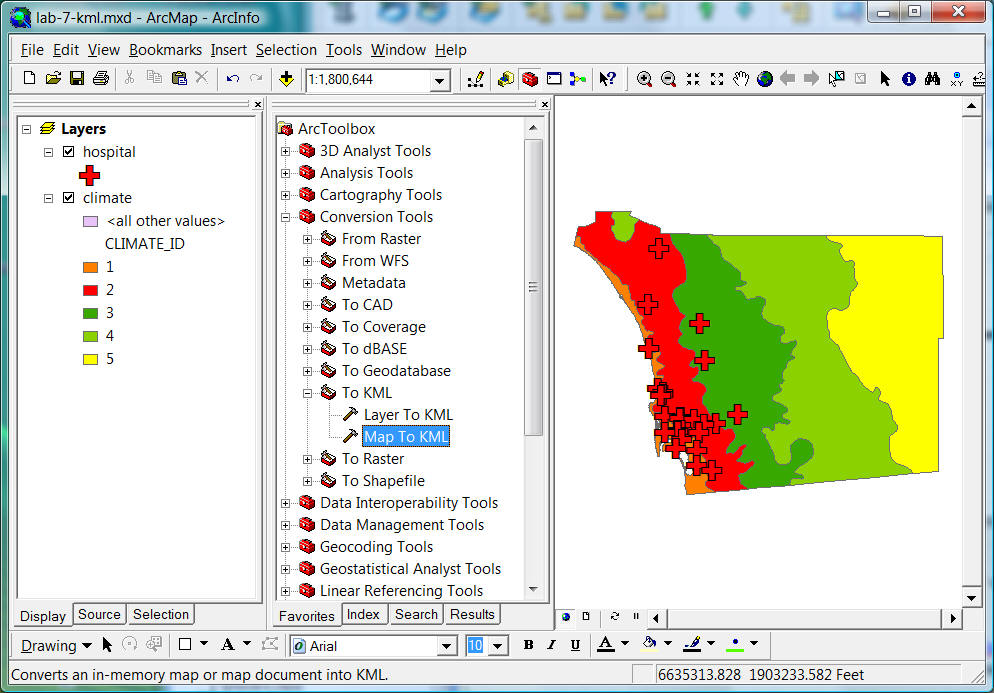
4. The next step is to convert this map into KML or KMZ file. --> Open the ArcToolBox (the red box icon).
5. Click on the "Conversion Tools" --< Select [To KML].--> [Map to KML]
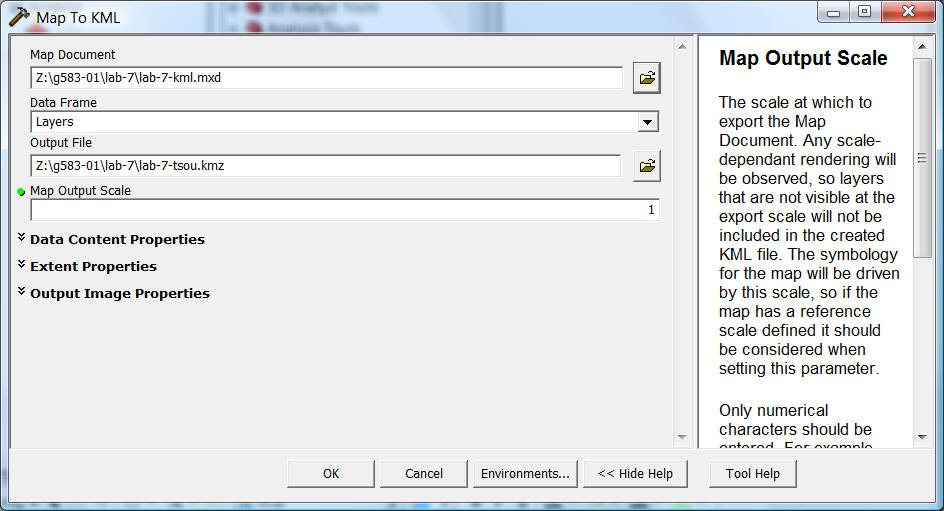
6. In the Map Document window, link to the \Lab-7\lab-7-kml.mxd.
7. In the Output file: type Z:\lab-7\lab-7-[yourlastname].kmz
8. Map Output Scale : type "1".
Click on [OK]
9. a new KMZ file will be created in the lab-7 folder.
10. Copy the KML file (lab-7-[lastname].kmz) to your person website folder (in Z:\web-[lastname])
10 Save ArcMap and quit.
11. Save Frontpage and publish the website. (once you publish the whole website, the KMZ file will also be published on the website.)
12. To add KML or KMZ file into the Google Map, create the following links in your LAB-7 webpage:
(Type the following in the HTML editor).
http://maps.google.com/?q=http://geoinfo.sdsu.edu/583student/g583-##/lab-7-[lastname].kmz
(copy this line, open the hyperlink property, paste the exact same line as the hyperlink). If the hyperlink is not started with http://maps.google.com...., your KMZ file will not be embedded inside the Google Map, but launching Google Earth to view it.)
For example http://maps.google.com/?q=http://geoinfo.sdsu.edu/583student/g583-01/lab-7-tsou.kmz
13. Follow the previous step and embed this new KML-Google Map into your Lab-7 web page.
<iframe width="500" height="350" frameborder="0" scrolling="no" marginheight="0" marginwidth="0" src="http://maps.google.com/?q=http:%2F%2Fgeoinfo.sdsu.edu%2F583student%2Fg583-01%2Flab-7-tsou.kmz&ie=UTF8&s=AARTsJqlB1SnInKTji_U5q9SMx-TVjemAA&ll=33.017876,-116.8396&spn=1.612077,2.746582&z=8&output=embed"></iframe><br /><small><a href="http://maps.google.com/?q=http:%2F%2Fgeoinfo.sdsu.edu%2F583student%2Fg583-01%2Flab-7-tsou.kmz&ie=UTF8&ll=33.017876,-116.8396&spn=1.612077,2.746582&z=8&source=embed" style="color:#0000FF;text-align:left">View Larger Map</a></small>
![]()
STEP -3 Applying a Google API Key.
Google API key
is an authorized key to embed Google application programming interfaces (API),
e.g. Google Maps, into web pages. The Google API key is valid within a directory
in a web server.
In
the following example, I will show you how to register the SDSU web server (http://map.sdsu.edu)
for a Google API key.
We
accessed to Google API key website:
http://code.google.com/apis/maps/signup.html and
sign in the URL of directories (e.g.
http://map.sdsu.edu) to access a Google API key, as shown in Figure 1.
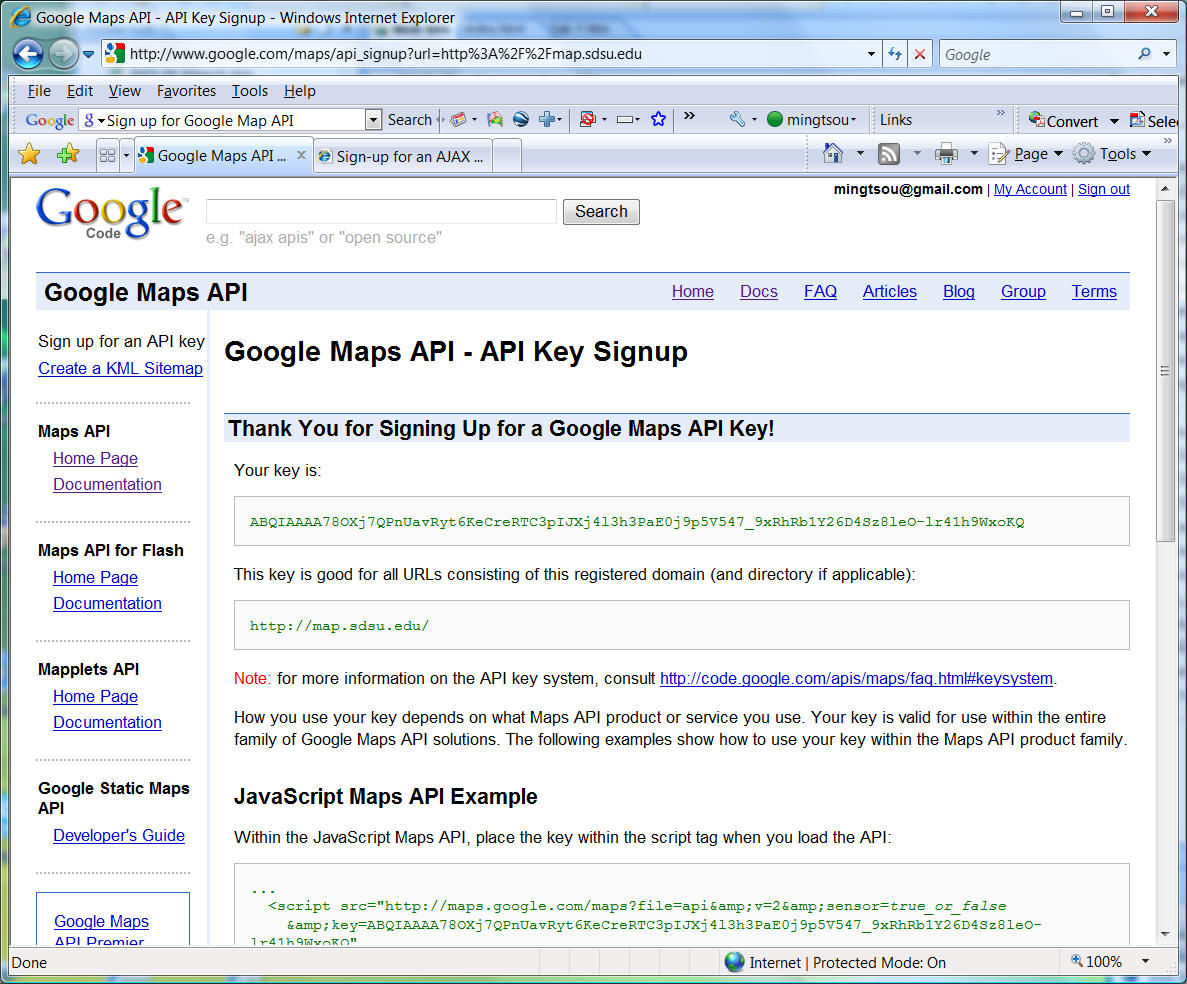
we need to copy this key and paste it behind the following text in our customizable Google Map webpage:
<script type="text/javascript" src="http://www.google.com/jsapi?key= your key">
For
example, <script type="text/javascript"
src="http://www.google.com/jsapi?key=
ABQIAAAA78OXj7QPnUavRyt6KeCreRTC3pIJXj4l3h3PaE0j9p5V547_9xRhRb1Y26D4Sz8leO-lr41h9WxoKQ”
>
Different "directories" or Websites will require different Google API Keys. So, the KEY for map.sdsu.edu will be different from geoinfo.sdsu.edu.
The KEY for GEOINFO.SDSU.EDU is
ABQIAAAA78OXj7QPnUavRyt6KeCreRTpVH2toeEwbyQGC0vzAC5qVTYz0BTP3umCOsf81uDAylJxbHPpli8Q6g
![]()
STEP -4 Write a Google Maps API application.
1. Read the following pages (Map Basics): http://code.google.com/apis/maps/documentation/introduction.html
2. Use Notepad to create a new HTML document (Google-API.htm) with the following contents:
<!DOCTYPE html "-//W3C//DTD XHTML 1.0 Strict//EN" "http://www.w3.org/TR/xhtml1/DTD/xhtml1-strict.dtd"> <html xmlns="http://www.w3.org/1999/xhtml">
<head> <meta http-equiv="content-type" content="text/html; charset=utf-8"/>
<title>Google Maps JavaScript API Example</title>
<script src="http://maps.google.com/maps?file=api&v=2&key=ABQIAAAA78OXj7QPnUavRyt6KeCreRTpVH2toeEwbyQGC0vzAC5qVTYz0BTP3umCOsf81uDAylJxbHPpli8Q6g&sensor=true" type="text/javascript"></script>
<script type="text/javascript"> function initialize() { if (GBrowserIsCompatible()) { var map = new GMap2(document.getElementById("map_canvas")); map.setCenter(new GLatLng(37.4419, -122.1419), 13); map.setUIToDefault(); } } </script> </head>
<body onload="initialize()" onunload="GUnload()"> <div id="map_canvas" style="width: 500px; height: 300px"></div> </body> </html>
3. Create a link [Click HERE to open the Google API map] in the LAB-7 webpage and link to the Google-api.htm.
4. Publish the website. Review if these new Google maps
work or not.
For more information about Google Map API: Check
Map Overlay: http://code.google.com/apis/maps/documentation/overlays.html
Services: http://code.google.com/apis/maps/documentation/services.html