Web-based Exercise #1
Mapping the Earth
Estimated time: 4 hour
Grading: 8 points total (ONE point for each question).
Due Day: Feb 8 at the beginning of lecture (before 2:00pm).
You should upload your lab answers to the Blackboard (http://blackboard.sdsu.edu) before the lecture. We will use the Timestamp on your documents in the Blackboard to check if your assignment is late or not.
(In your upload file, please use this title: GEOG104-LAB-1-[Your name].doc (or txt or pdf). Please write down your answers in MS Word or WordPAD or other word processing software. Please always save a local backup copy of your own answers.)
1. Installing Google Earth Pro on desktop.
Estimated time: 8 minutes (Note: you need to have the writing privilege for installing new software in a local personal computers, if you can not install Google Earth, please use our SAL lab machine. Each machine in the SAL lab has pre-installed Google Earth.)
Go to https://www.google.com/earth/desktop/
There are three versions of Google Earth: Google Earth, Google Earth Plus and Google Earth Pro. We will use the Google Earth Pro in this exercise.
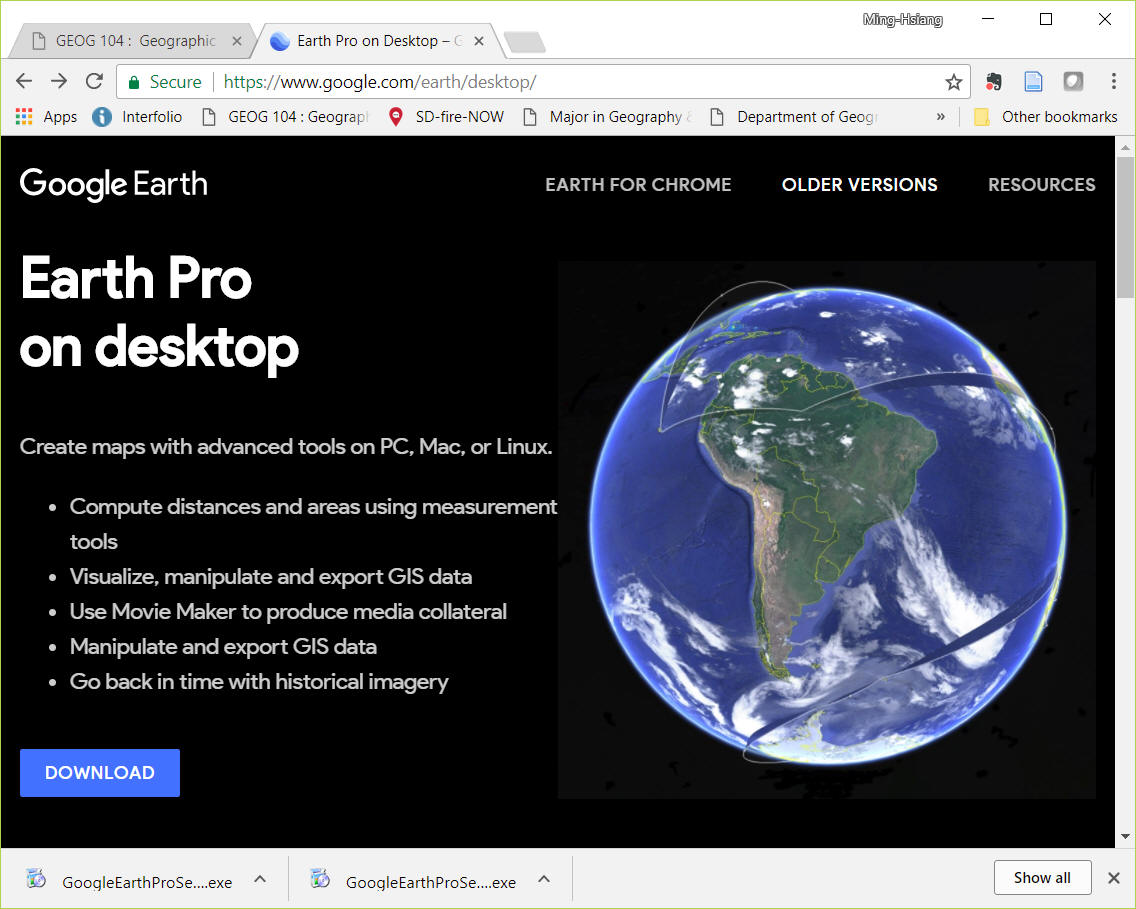
Figure 1: Google Earth Pro Webpage
Click “Agree and Download”.
Check your computer system configurations to make sure your computer can run Google Earth. The estimated download time and install time would be 3-5 minutes.
Click “Run Google Earth Pro”
If you are using Norton Internet Security tool, please make sure the firewall allow Google Earth to access the Internet.
When installation is finished, launch the Google Earth Pro program. The interface of Google Earth Pro looks like Figure 5.
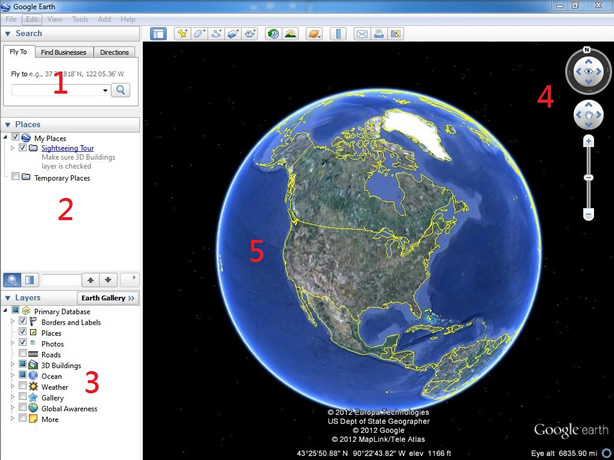
Figure 5: The Google Earth Interface
(1:Search Panel; 2:Places Panel; 3:Layers Panel; 4:Navigation Controls; 5:Map View)
2. Simple User Guide of Google Earth
Estimated time: 20 minutes
2.1 Interface and Functions
There are three operational panels (1-3), Navigation Control(4), and a map view (5) in the interface (Figure 5). The three panels are: Search Panel (Panel 1), Place Panel (Panel 2), Layer Panel (Panel 3). For detailed information, please go to http://earth.google.com/support/bin/static.py?page=guide_toc.cs
2.1.1 Search Panel (Figure 6)
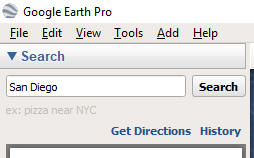
Figure 6: Search Panel
Type the keyword San Diego in the Search address field and then press the enter key. This will fly you to the City of San Diego, California (Figure 7).
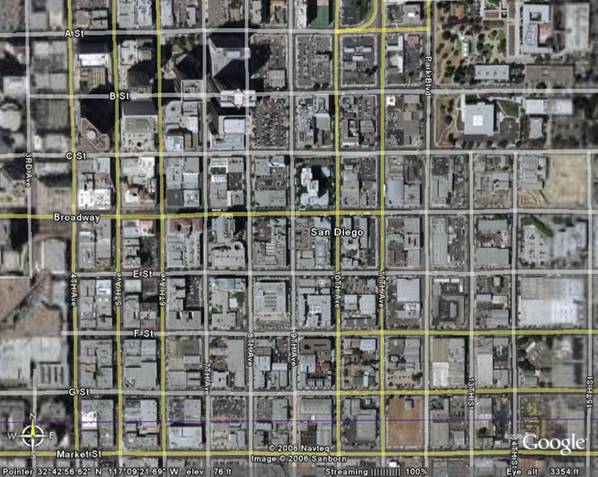
Figure 7: Flying to San Diego
You can also try your home address to take a look at your house from the sky.
Given current view, you can try the “SDSU” in the Search Box.
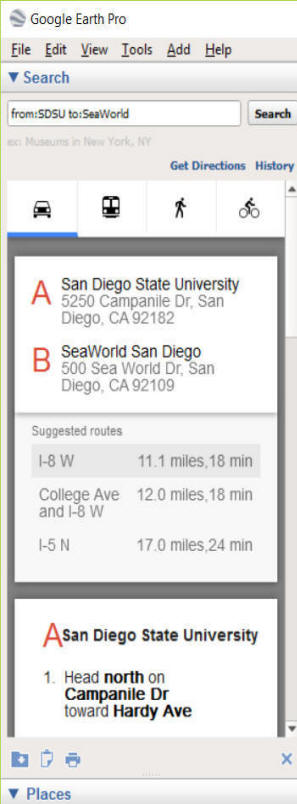
In the Search window, click on "Get Direction" to create a route from SDSU to SeaWorld, San Diego.
2.1.2 Place Panel
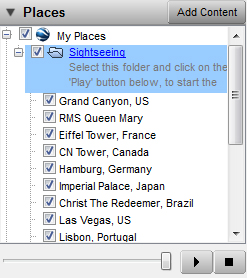
Figure 12: Place Panel
In the place panel (Figure 12), Google Earth Pro provides a virtual tour. You can click on the "Sightseeing Tour" first, then select one Place in the "Tour Guide" bar.
You can click on the “Start tour here” button. Many famous sightseeing places have been included.
You can also create your own sightseeing tour by right clicking on the “My Place” -> “Add” --> “Placemark”. You can add a placemark in the map to make a virtual tour (Figure 13).
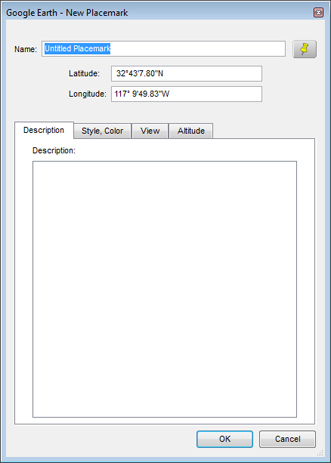
Figure 13: Create a New Placemark
2.1.3 Layer Panel
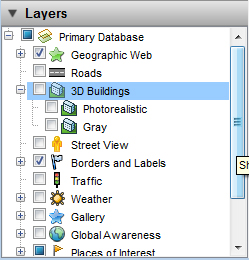
Figure 14: Layer Panel
You can manipulate the layers in the layer panel (Figure 14). Select the layers you are interested to display in the map view.
2.1.4 Navigation Controls
Go to the “View” pull-down menu and toggle on the “Overview Map” by clicking on the option from the pop-down list. If it is already selected, leave it alone.
Here is a list of some of the basic controls and their functions:
The “Look Joystick” control  : Use the Look joystick to look around as if you were turning your head. Click an arrow to look in that direction or continue to press down on the mouse button to change your view. After clicking an arrow, move the mouse around on the joystick to change the direction of motion.
The “Move Joystick” control  : Use the Move joystick to move your position from one place to another. Click an arrow to look in that direction or continue to press down on the mouse button to change your view. After clicking an arrow, move the mouse around on the joystick to change the direction of motion.
The "Zoom Slider" ![]() : To get closer to the ground to see more detail but in a smaller geographic area. Try to clicking and dragging the slider toward the plus/minus sign; try double-clicking on any part of the image.
: To get closer to the ground to see more detail but in a smaller geographic area. Try to clicking and dragging the slider toward the plus/minus sign; try double-clicking on any part of the image.
The "Hider/Show Sidebar" ![]() : To conceal or the display the side bar (Search, Places and Layers panels).
: To conceal or the display the side bar (Search, Places and Layers panels).
The “Add Placemark” control ![]() : To add a placemark for a location.
: To add a placemark for a location.
The “Measure” control ![]() : To measure a distance or area size.
: To measure a distance or area size.
The “Add Overlay” controls ![]() : To create and add your own overlay features onto Google Earth. You can draw a polygon, a line, or add a graphic image to the map which Google Earth will “drape” over the terrain.
: To create and add your own overlay features onto Google Earth. You can draw a polygon, a line, or add a graphic image to the map which Google Earth will “drape” over the terrain.
The "Email" ![]() : To send the current view to a user with Google Earth or send an image of the current view to an email recipient.
: To send the current view to a user with Google Earth or send an image of the current view to an email recipient.
The "View in Google Maps"![]() : To show the current view in Google Maps in your web browser.
: To show the current view in Google Maps in your web browser.
The "Switch between Sky and Earth"![]() : A switch press between sky and earth. Click it to view stars, constellations, galaxies, planets and the Earth's moon.
: A switch press between sky and earth. Click it to view stars, constellations, galaxies, planets and the Earth's moon.
2.2 Google Earth Orientation Exercises
Be sure to open the Google Earth Pro software application on your desktop. Practice using the buttons described above and observing their functions after opening Google Earth on your desktop as described below.
The next step is to type the keyword SDSU in the Search address field and then press the enter key. This will fly you to the center of
SDSU.
Now we are going to introduce an important concept in GIS called, “Map layers.” Map layers are layers of map features, data, or imagery that can be overlaid or stacked together like layers on a cake or toppings on a burger. Now turn on the "Places", "Roads," and "3D Buildings" features in the "List of Layers (Figure 16).
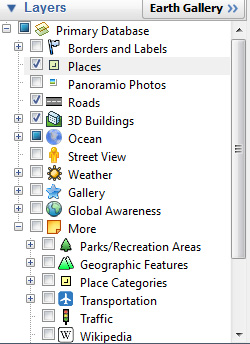
Figure 16: Map Features
You can now add more feature layers to Google Earth by clicking on the check boxes in the Layers Panel at the left of the screen (left side of Figure 17 below). Click on several. You may want to select "More" -- "Place Categories" --> Dining, Shopping Malls, or "More" -- "Transportation" ---Rail etc. Even though you have turned on some layers, their associated features may not be visible until you sufficiently Zoom In or go to the geographic areas where they occur. This is called “scale-dependent features.” It would not make sense to show all buildings on the map when you are zoomed out all the way to the point where you can see the entire planet! In real life, you would not see all of these features from outer space. Google Earth and other Virtual Earth-type applications make features like roads, buildings, parks, etc. visible only when they would be visible in real life.
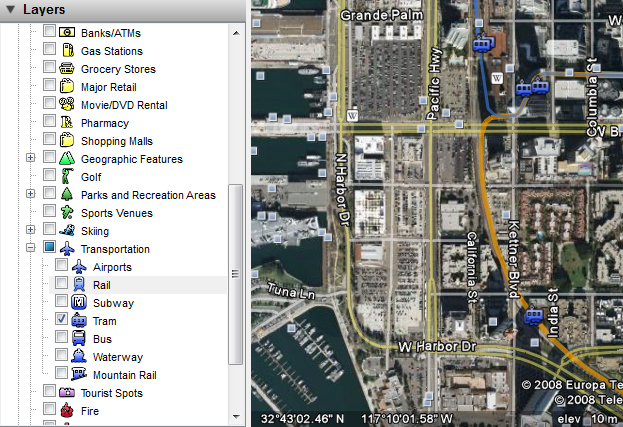
Figure 17: Feature Layers (Left) and Features (Right)
Try some examples of 3D View.
a) The Grand Canyon in Arizona (dramatic terrain):
Fly to the Grand Canyon by Entering “Grand Canyon” in the “Search” Address Field, choose terrain, and press enter. (See Figure 18)
Exploring the Grand Canyon area by moving around (panning) and zooming in and out.
Tips: You can PRESS and HOLD your Mouse's center roller to adjust your 3D view.
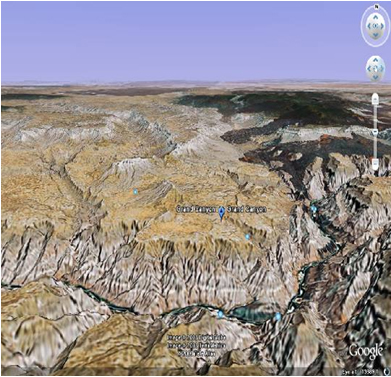
Figure 19 a 3D perspective of Grand Canyon in Arizona
b) Downtown San Diego:
Try the same way as above. Choose Roads, 3D buildings, borders, and free to zoom in, zoom out and tilt (Figure 20).You just need to enter “San Diego, CA” in the “Search" Field. The focus of Google Earth is the downtown San Diego area.
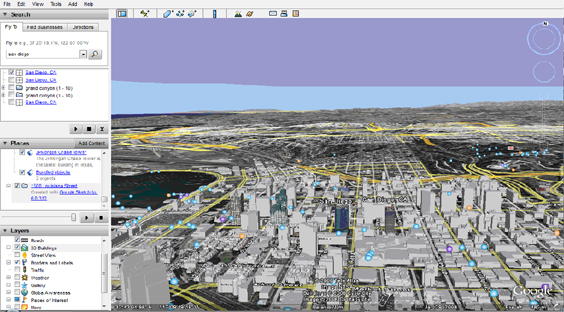
Figure 20 Downtown San Diego
Now you are free to use the Google Earth navigation tools (Figure 20) like Zoom In, Zoom Out, Tilt, etc. Please try the different functions to see what happens.
2.3 The Google 3D Warehouse Example
Computer-aided design (CAD) is the use of computer technology to aid in the design of 3D models and/or 2D drawings of physical components. CAD has become an especially important technology within the scope of computer-aided technologies. Google has developed its own CAD software “Google Sketchup”. You can use it to create, modify and share 3D models. It's easier to learn than other 3D modeling programs, which is why so many people are already using it.
The Google 3D Warehouse is an online repository of 3D models. Anyone can search for and download models, but to publish your own, you'll need to sign in using your Google account. If you model 3D buildings and would like to share them with the world, you can do so through the "Best of the 3D Warehouse" layer in Google Earth. Only the very best models are selected for inclusion in this layer.
Navigate to the website
https://3dwarehouse.sketchup.com/collection/e0335df4cda859c791be0d72e8ec2d62/Google and click anything under the catalog of “3D Building Collection” (Figure 21).
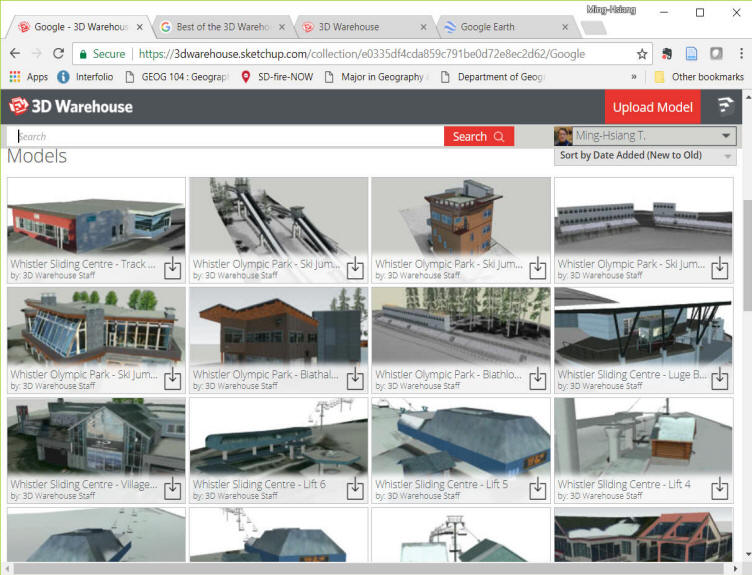
Figure 21: Google 3D Warehouse
Choose any collection you interest in and click on the image to open the individual view.
Click on "Download" button, then select "Google Earth KMZ". Then click on the downloaded KMZ file to open the 3D model inside the Google Earth Pro. If you get a warning notice, just click on "OK".
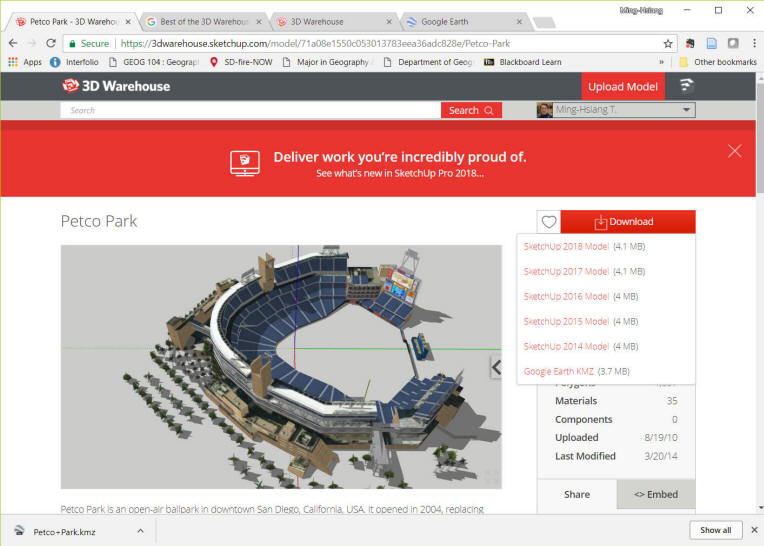
Click any model you interested in and see the 3D module in Google Earth (Figure 22). (Note: not all 3D models are available to see in Google Earth.)

Figure 22: Navigation Tools
You can also try other cities or famous sightseeing places to get familiar with Google Earth Pro.
3. Class Exercises
Estimated time: 3 hour
3.1 Direction Exercise and Converting Latitude and Longitude to Decimal Degree.
Use the “Get Directions” function to find out the directions from your home address to the school.
Please go to http://support.google.com/earth/bin/answer.py?hl=en&
answer=148081&topic=2376017&ctx=topic for more information about address searching rules.
Next, you need to identify the Latitude and Longitude of of SDSU Geography Building. First, type "SDSU Geography", you will see "Department of Geography" marker in the first search result. Right-Click on the "A: Department of Geography" and select "Save to My Places".
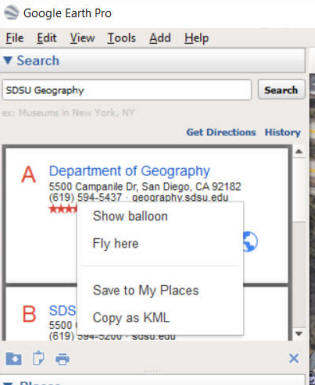
In the "Places" Window, select the "Department of Geography", Right-Click on it, select Property. You will see the Latitude and the Longitude of the Geography Department. Close the window.
Now select the "Tools" from the TOP MENU in Google Earth Pro. --> "Options". Change the "Show La/Long" option from "Degrees, Minutes, Seconds" to "Decimal Degree".
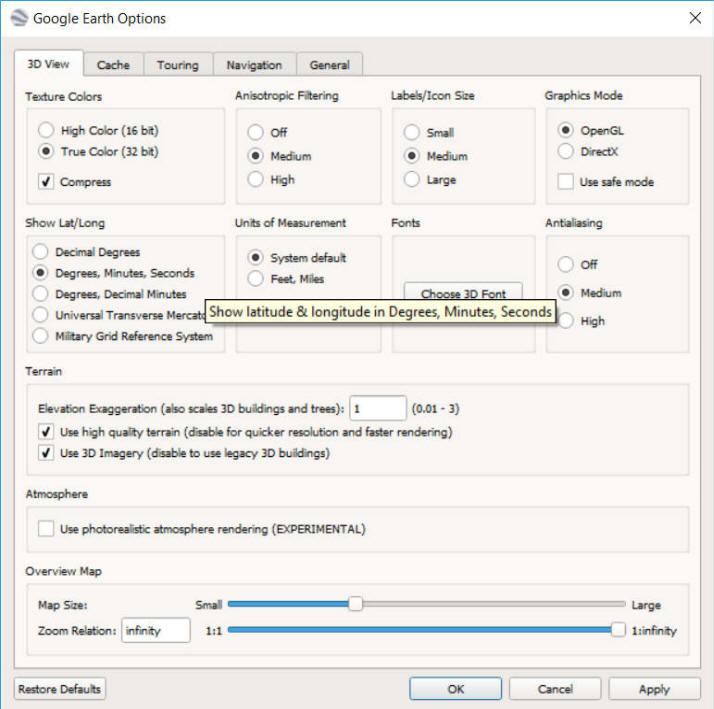
Click on "OK" to close the option window.
Now you can notice that the coordinate systems in Google Earth Pro has been changed to decimal degree system now.
In GIS, most Latitudes and Longitudes will be converted into Decimal Degrees, which is easier for computers to process the point location. For more explanation about Decimal Degree, please read here: http://en.wikipedia.org/wiki/Decimal_degrees
Try to view the coordinates again for the Department of Geography Marker.
Can you tell us WHY the decimal degrees of Longitude
becomes "negative" value?
You can try some online conversion tool between decimal degrees and
traditional format here:
https://www.latlong.net/degrees-minutes-seconds-to-decimal-degrees
Please try to answer the following questions.
(Q1) What is the Latitude and Longitude of the SDSU LOVE LIBRARY? (Hint: First locate the Library DOME; then, find out the latitude and longitude coordinate values by moving your mouse cursor over the image of your school. Coordinates will appear on the bottom. You may need to turn off the Tour Guide to see the coordinates.). What is the Decimal Degree of the SDSU LOVE LIBRARY?
(Q2) Use the Measuring tool (located in the Tools pull-down menu) to measure the direct straight line distance between your home address and the LOVE Library. Use Miles as the measuring unit. Compare the distance with you obtain in the driving directions. Are you happy with the route Google Earth calculates for you?
(Please write down these answers in your notes, you will need to type them again later)
3.2 The Bird Flu Example
We will try the bird flu example introduced in the class.
Bird flu is a contagious viral infection that can affect all species of birds. The contagious virus lives primarily in the respiratory system in the infected birds, and human infection occurs when people come into contact with infected birds or contaminated surfaces. There are thought to be millions of migratory ducks and wildfowl which carry the disease. Worldwide, according to the World Health Organization, more than 135 humans’ infections of the virus have been recorded.
On November 16, 2005, Nature Magazine's Senior Reporter Declan Butler has thoroughly researched the Avian Flu outbreak information and has published the confirmed cases of Avian Flu in a Google Earth file. His avian outbreak map includes Human cases, and a time series of placemarks showing the progression of the flu over the last 18 months.
Click the link http://www.declanbutler.info/Flumaps1/Timeseries.kml to open the KML file. Then Google Earth will be automatically launched. If you see alert message window, click “OK” to continue. (If you cannot see the maps, in the "Places" panel, double-click on "Time series of H5N1 distribution maps" under the category of "Temporary Places".) Since it is a time series map, you need to adjust the time series window (on the top to see the outbreak cases).
First, zoom-in to China a little bit. Then adjust the Time series window as the following: (move the BIG white tab to the left and the small white table to the right).
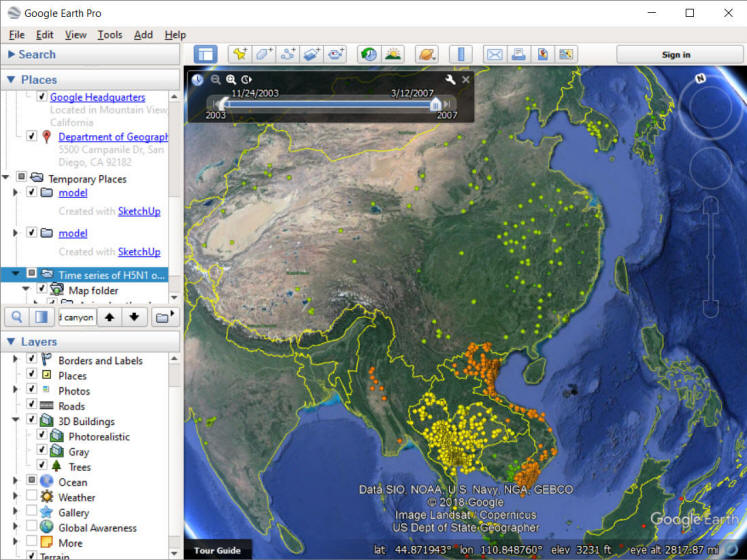
Figure 25: Bird Flu Example
In the “Places" panel,
click on the folder of the layer of “Additional datasets”.
--> Select "Gridded density of poultry worldwide".
If you see the alert message window such as “Unsupported image format, go_Russia.png”, click “ok” and remove the Russia layer( “Additional Datasets à Gridded density of poultry worldwideàRussia”)
This way you can view the poultry density for any continent you are interested in. You can focus on the human cases or animal breaks by selecting the respective layers. For example, you may notice that there were quite a few human cases happened in the first several months of 2006 in the Middle East (Figure 26). For each case, you can make an inquiry to learn more information by directly clicking on the symbol. Please keep track of the spread of the flu virus based on the maps.
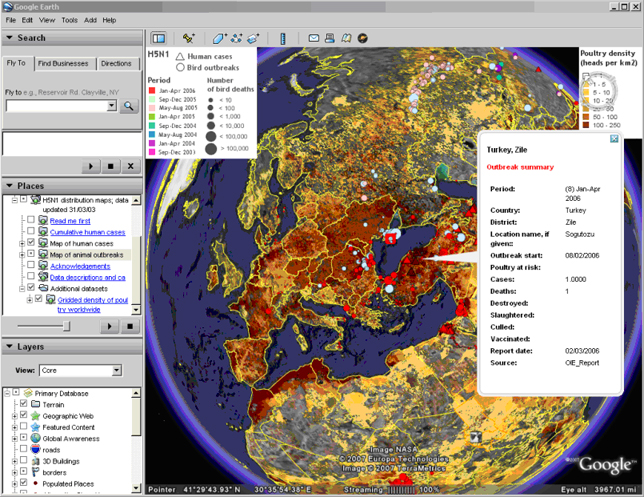
Figure 26: Bird Flu Human Cases in the Middle East
Based on the bird flu maps, please answer the following questions.
(Q3) Describe the geographic patterns of the bird flu for both bird and human cases in the Middle East by viewing the bird flu maps. Explain the spatial relationship between human cases and bird cases.
(Q4) Try to identify how many human cases happened in Turkey and report their Latitudes and Longitudes (Hint: in the place panel, only select the “Map of human cases”). Make sure to click on each icon to see the detailed information of each case.
(Q5) According to the maps, how can you predict the potential areas that can be impacted by the bird flu (Hint: Use poultry density map and if possible try to search for bird migration information)?
(Please write down these answers in your notes, you will need to type them again later)
3.4 The Flight Example
Go to https://www.flightradar24.com/ . This website provides flight tracking services which are visualized with maps. For example, we can take a look at inbound flight traffics for Los Angeles International Airport (LAX). Search for (LAX) Los Angeles Int” under the Search Window.
You can try their "3D View" and other functions in the App.

Please answer the following questions.
(Q6) For LAX inbound flight traffics at the time you are viewing the map. Please select TWO examples. (Do not this exercise at night because you may not be able to see any flight). List their flight numbers and their "CALIBRATED ALTITUDE" if available, and their Coordinates (Decimal Degree). Include TWO screen shots from your flight selection into the report (Check the next Section 4. Flight Simulator about how to make a screen shot).
(Q7) Zoom to San Diego Airport and report TWO of the planes which are about to take off or land. (Do not this exercise at night because you may not be able to see any flight)
(Please write down these answers in your notes, you will need to type them again later)
4. Flight Simulator
Google Earth has a built-in flight simulator that allows you to 'fly' a simulated aircraft. For detailed instructions visit the help pages,http://earth.google.com/userguide/v4/ug_flightsim.html. We will take a simplified flight using the simulator leaving from Los Angeles International Airport. Make sure to capture a screen shot of your flight, you will need it later in the questions section.
To capture a screen shot using Windows press 'Print Screen' on the keyboard (if you are using a laptop you may have to press 'Function' and 'Print Screen'). For a Mac press Command-Shift-3 on the keyboard. Using either Mac or Windows to capture a screen shot will put a copy of your screen onto you clipboard, which can then be pasted into a document. When you open a new Word document, press "Ctrl-V" (to Paste) the screen shot into your report.
The first thing to do is click Tools > Enter Flight Simulator. This will open the flight simulator start window.
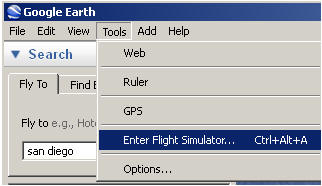
Figure 30. Enter Flight Simulator
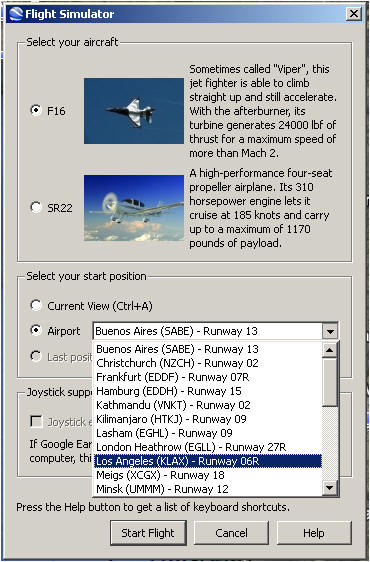
Figure 31. Flight Simulator Start Window
In the flight simulator start window select the aircraft that you would like to fly and select Los Angeles (KLAX) from the Airport drop-down menu. Google Earth will begin you flight by placing you on the LAX runway (figure 32), so we should go over some of the flight controls before you take off.
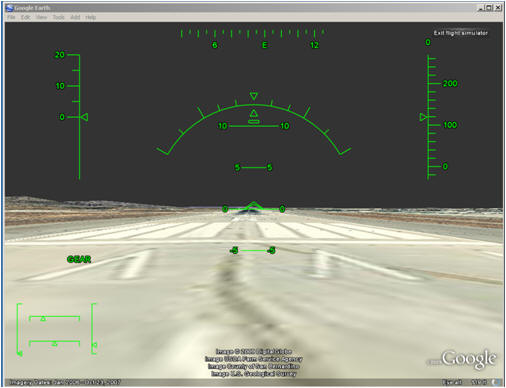
Figure 32. Takeoff From LAX Runway
Google provides a nice explanation of the head-up display (HUD) features on their help pages, http://earth.google.com/userguide/v4/ug_flightsim.html#flying, Figure 33 highlights the main features.
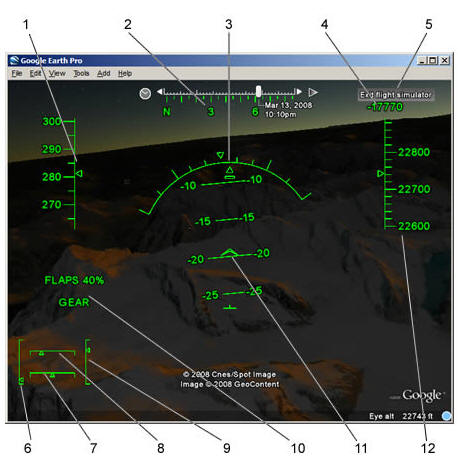

Figure 33. Flight Simulator Head-up Display
*** Google has a full description of all of the keyboard controls on their help page, http://earth.google.com/support/bin/static.py?page=guide.cs&guide=22385&topic=23746&answer=148092. Make sure to look at the controls before flight or you may end up very frustrated. Also, don't forget to raise the landing gear after you take off.
5. Keyhole Markup Language (KML) and Google Earth Customization
Estimated time: 30 minutes
5.1 Introduction to KML
The previous two examples use KML to encode geographic information and display them in Google Earth. KML stands for Keyhole Markup Language. KML is XML-based document with tags describing names and attributes for locations, symbolization styles, and image overlaying.
Anyone can create a KML file and display the geographic features with Google Earth. However, KML has to be used as a HTML link (e.g.http://services.google.com/earth/kmz/google_earth_tutorial_files.kml).
For a more detailed introduction, see http://earth.google.com/kml/whatiskml.html. For the tutorial, see http://earth.google.com/kml/kml_tut.html.
5.2 Creating KML-based Applications (Optional)
Use the KML tutorial sample as an example (http://services.google.com/earth/kmz/google_earth_tutorial_files.kml), download it and open with a text editor.
The document includes:
An XML Header,
![]()
A KML namespace declaration,
![]()
“Folder” XML-like Structures with multiple tag types,
Descriptions,![]()
Names, ![]()
Placemarks,
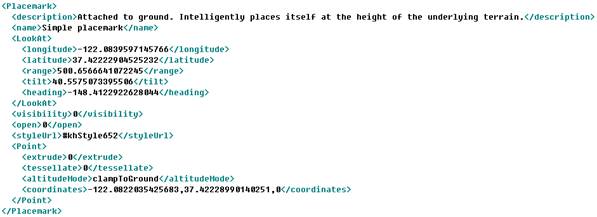
As we can see, a placemark typically has “description”, “name”, “look at (or camera view)”, “visibility”, “styleUrl”, “extrude”, “altitudeMode” and “coordinates” tags.
In addition to placemarks, KML also supports “Ground Overplays”, “Paths”, “Polygons”, and “Screen Overlays”.
You can either use a text editor to create a KML document or simple use Google Earth to do it. Start Google Earth, open “My Place” folder in the “Place Panel”, find the previous home-to-school route. Then right click to save the route as a KML file. Now you can publish it as a HTML link to share with others. You can also edit the KML document and try adding new tags into it.
5.3 The Google Earth Community
Try to register at the Google Earth Community (http://bbs.keyhole.com/) (Figure 34). In particular, you can go to KML discussion forum (http://bbs.keyhole.com/ubb/postlist.php/Cat/0/Board/SupportKML). Post your questions if you have.
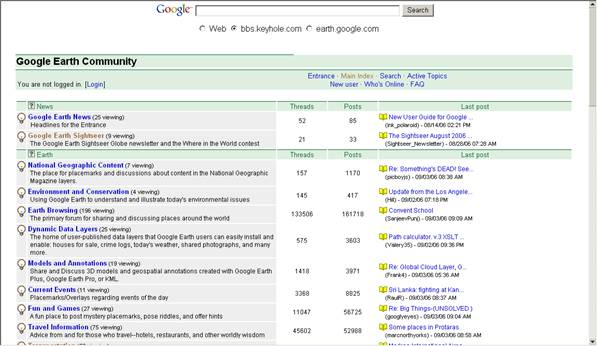
Figure 34: Google Earth Community
(Q8) Visit to the Google Earth Community ( https://productforums.google.com/forum/#!forum/gec ). Pick up ONE active topic forum from the topic list and write a short paragraph to introduce this topic and related discussion issues (for example, in the National Geographic Contents, some users discuss about watching the NGM cam. In the Travel Information topic, some users discuss various hotels and restaurant locations).
5.4 Google Earth Blogs and Related Websites
Also, there have been many Google Earth Blogs and hacking websites available online. Here is a list. Go check them out!
Absolutely Google Earth http://www.juiceanalytics.com/writing/2005/10/absolutely-google-earth-complete-tool-collection/
Google’s Earth http://www.googlesearth.com/
Google Earth Blog http://www.gearthblog.com/
Google Earth @ Wiki http://en.wikipedia.org/wiki/Google_Earth
Google Sightseeing http://www.googlesightseeing.com/
OGLE Earth http://www.ogleearth.com/
How Google Earth Works http://computer.howstuffworks.com/google-earth.htm;
Submit the Web Exercise #1
Due Day: Feb 8 at the beginning of lecture (before 2:00pm).
You should submit your lab answers to the Blackboard (http://blackboard.sdsu.edu) - "Web Exercise Submission" before the lecture. We will use the Timestamp on your documents in the Blackboard to check if your assignment is late or not.
(In your upload file, please name the file as GEOG104-LAB-1-[Your name].doc (or txt or pdf). Please write down your answers in MS Word or WordPAD or other word processing software. Please always save a local backup copy of your own answers.)
(Q1) What is the Latitude and Longitude of the SDSU LOVE Library? (Hint: First locate the Library DOME first; then, find out the latitude and longitude coordinate values by moving your mouse cursor over the image of your school. Coordinates will appear on the bottom). What is the Decimal Degree of the SDSU LOVE LIBRARY?
(Q2) Use the Measuring tool (located in the Tools pull-down menu) to measure the direct straight line distance between your home and the Library. Use Miles as the measuring unit. Compare the distance with you obtain in the driving directions. Are you happy with the route Google Earth calculates for you?
(Q3) Describe the geographic patterns of the bird flu for both bird and human cases in the Middle East by viewing the bird flu maps. Explain the spatial relationship between human cases and bird cases.
(Q4) Try to identify how many human cases happened in Turkey and report their Latitudes and Longitudes (Hint: in the place panel, only select the “Map of human cases”). Make sure to click on each icon to see the detailed information of each case.
(Q5) According to the maps, how can you predict the potential areas that can be impacted by the bird flu (Hint: Use poultry density map and if possible try to search for bird migration information)?
(Q6) For LAX inbound flight traffics at the time you are viewing the map. Please select TWO examples. (Do not this exercise at night because you may not be able to see any flight). List their flight numbers and their "CALIBRATED ALTITUDE" if available, and their Coordinates (Decimal Degree). Include TWO screen shots from your flight selection into the report (Check the next Section 4. Flight Simulator about how to make a screen shot).
(Q7) Zoom to San Diego Airport and report TWO of the planes which are about to take off or land. (Do not this exercise at night because you may not be able to see any flight)
(Q8) Visit to the Google Earth Community ( https://productforums.google.com/forum/#!forum/gec ). Pick up ONE active topic forum from the topic list and write a short paragraph to introduce this topic and related discussion issues (for example, in the National Geographic Contents, some users discuss about watching the NGM cam. In the Travel Information topic, some users discuss various hotels and restaurant locations).
!! Important Note:
You should upload your lab answers to the Blackboard (http://blackboard.sdsu.edu) before the lecture. We will use the Timestamp on your documents in the Blackboard to check if your assignment is late or not.
