Help Document
![]() Open
and reorder multi-temporal image themes (layers)
Open
and reorder multi-temporal image themes (layers)
![]() Click and hold down mouse to drag a rectangle box to zoom in the area
of interest
Click and hold down mouse to drag a rectangle box to zoom in the area
of interest
![]() Click and hold down mouse to drag a rectangle box to zoom out
Click and hold down mouse to drag a rectangle box to zoom out
![]() Drag
the mouse upper-right to zoom in, lower left to zoom out
Drag
the mouse upper-right to zoom in, lower left to zoom out
![]() Click
and drag the mouse to pan the image
Click
and drag the mouse to pan the image
![]() Click
to fit the image on screen to full view
Click
to fit the image on screen to full view
![]() Click
and open the set units dialog box, change the length and area units used
for display.
Click
and open the set units dialog box, change the length and area units used
for display.
![]() Click
to measure point position in
the displayed image
Click
to measure point position in
the displayed image
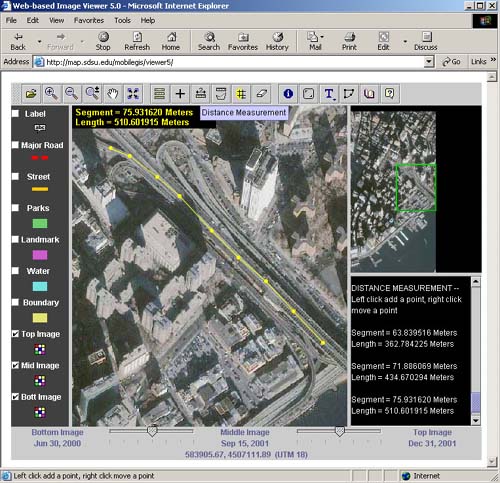
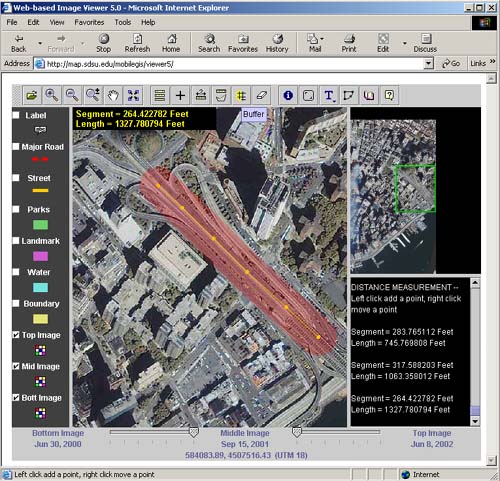
![]() Click
to measure length and segments in the displayed image. Left click the
mouse to add a point in the image,
draw a line representing the distance you want to measure, right
click and drag the mouse to move a point. The length is the accumulative
distance of line segments.
Click
to measure length and segments in the displayed image. Left click the
mouse to add a point in the image,
draw a line representing the distance you want to measure, right
click and drag the mouse to move a point. The length is the accumulative
distance of line segments.
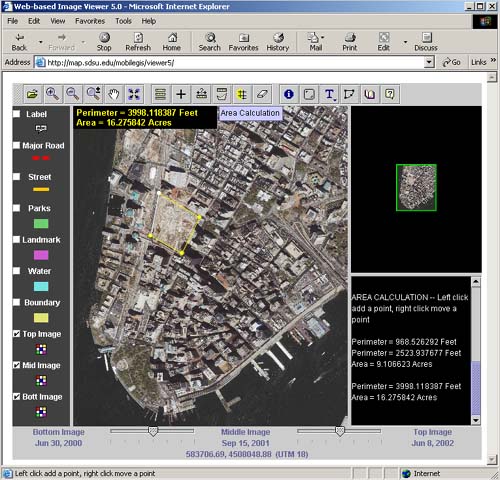
![]() Click to measure perimeters and areas in the displayed image. Left click
mouse pointer on image to add a point. Continue clicking to outline area
of interest. Right click and drag the mouse to move a point
Click to measure perimeters and areas in the displayed image. Left click
mouse pointer on image to add a point. Continue clicking to outline area
of interest. Right click and drag the mouse to move a point
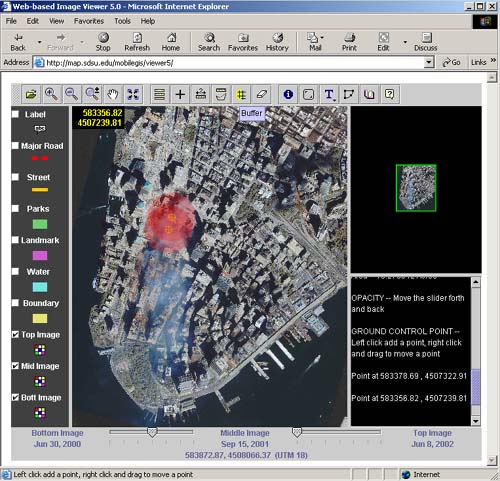
![]() Digitize
geographic point, line or polygon you want to buffer around first (the
more vertices, the better), then click the buffer and popup buffer dialog
box, type the distance and select the units to create a buffer area around
the feature, a buffer zone will be created at the distance you specified.
Digitize
geographic point, line or polygon you want to buffer around first (the
more vertices, the better), then click the buffer and popup buffer dialog
box, type the distance and select the units to create a buffer area around
the feature, a buffer zone will be created at the distance you specified.
![]() Click
this icon to remove all digitized
points,
line, polygon or selected features on the image.
Click
this icon to remove all digitized
points,
line, polygon or selected features on the image.
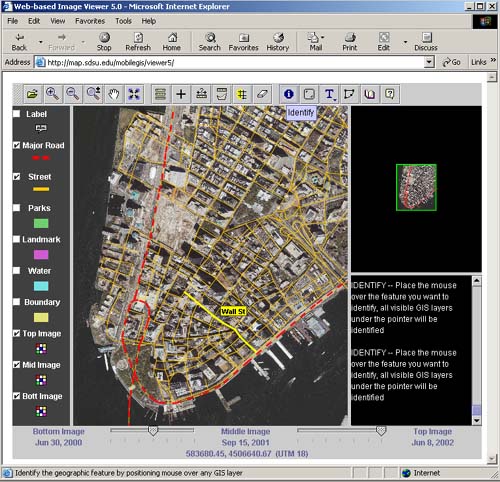
![]() Click this icon and move the mouse pointer over a feature you want to
identify. The features in any visible GIS layers under the pointer will
be identified.
Click this icon and move the mouse pointer over a feature you want to
identify. The features in any visible GIS layers under the pointer will
be identified.
![]() Select geographic features by dragging a rectangle around them, all visible
GIS layers within the box will be highlighted. To deselect selected features,
click or drag the mouse where there are no features.
Select geographic features by dragging a rectangle around them, all visible
GIS layers within the box will be highlighted. To deselect selected features,
click or drag the mouse where there are no features.
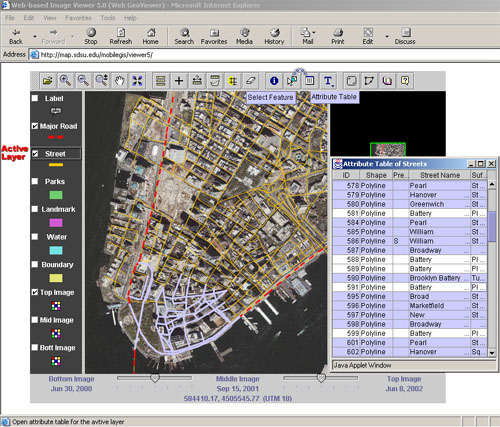
![]() Before you open a layer's attribute table, 1) Turn the layer check box
on
Before you open a layer's attribute table, 1) Turn the layer check box
on ![]() . 2) make the layer active
. 2) make the layer active
![]() (bevel border).
3) highlight the layer using select feature icon
(bevel border).
3) highlight the layer using select feature icon![]() that you wish to see the attributes.
that you wish to see the attributes.
Tip:
1. When you select feature records in a
attribute
table, the feature highlights on the map
2.
To select consecutive records in a table, click and drag the mouse up
or down
3. Press and hold the Ctrl key while clicking additional records
4. Click Ctrl+A
to select
all the records in the attribute table
![]() Click to open a search dialog box. Type the attribute value of interest
in the text field, and then click the find button to search for the attribute
in geodatabase. The found features will list in the results window and
click to highlight features on the map.
Click to open a search dialog box. Type the attribute value of interest
in the text field, and then click the find button to search for the attribute
in geodatabase. The found features will list in the results window and
click to highlight features on the map.
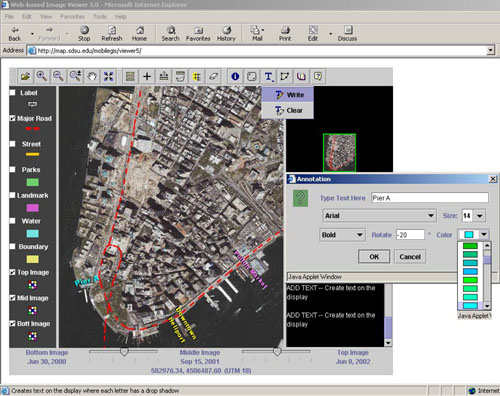
![]() Click the mouse pointer on the display where you want to add the text,
a text dialog box will popup and type the text string in the text field,
choose the font name, style, size, color, and
rotation angle for
the display.
Click the mouse pointer on the display where you want to add the text,
a text dialog box will popup and type the text string in the text field,
choose the font name, style, size, color, and
rotation angle for
the display.
![]() Click to remove all the texts you added on the display
Click to remove all the texts you added on the display
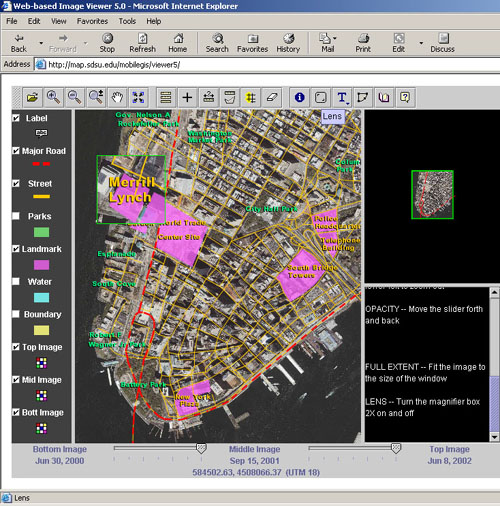
![]() Turn the magnifier window 2X on and off, drag the window to see a magnified
view of a small area without changing the extent of your view.
Turn the magnifier window 2X on and off, drag the window to see a magnified
view of a small area without changing the extent of your view.
![]() Turn
on-screen coordinate display visible and invisible
Turn
on-screen coordinate display visible and invisible
![]() Click to open the help document
Click to open the help document
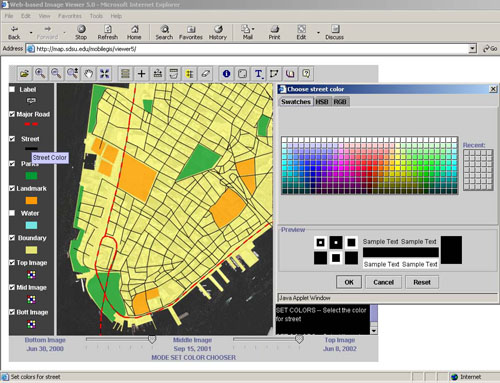
![]() Click
the color button to change the GIS layer and legend color
Click
the color button to change the GIS layer and legend color
![]() Click
the check box to turn the GIS layer on and off
Click
the check box to turn the GIS layer on and off
![]()
![]()
Move
left slider to blend/fade the middle image, right slider to blend/fade
the top image. When the applet is initialized, move the right slider first
instead of the left, because the top image covers the middle and bottom
image.
Some Screen Shots for Hint